
In this guide, I explain how to build an automated system that processes customer inquiries, generates personalized AI/LLM responses, and sends emails without human intervention.
Handling customer inquiries efficiently is crucial for any business, but manually responding to every email can be time-consuming and inconsistent. Many companies struggle to balance personalized communication with scalability, especially when dealing with inquiries that require nuanced responses. AI-driven automation now offers a way to streamline this process, ensuring timely, customized replies while freeing up valuable human resources. In this guide, I’ll walk you through how to implement a fully automated AI email response system that maintains quality and improves efficiency.
Content
- The Backstory: This Would Not Have Been Possible Five Years Ago!
- Preparation: Checklist for Your AI-Powered Email System
- Script #1: The Email-Parser
- Script #2: The Response-Generator
- Intermediate Step: Pick the Right Model or Fine-Tune Your Own
- Script #3: The Email-Sender
- Bringing It All Together with Cron Jobs
- Important Notes on Security
- Results & Summary
The Backstory: This Would Not Have Been Possible Five Years Ago!
Years ago, a client approached me and asked if I could automate replies to requests received via their website’s contact form. After analyzing the case, my answer was no. I had previously worked with them to develop the reply templates, so I knew their process inside and out. Their business revolves around a highly customizable personal product, and their request form allows buyers to select from numerous options while also leaving space for additional questions or special requests. These factors heavily influenced the responses each customer received, making full automation too complex at the time.
For example, the style of the replies varies between male and female clients. Some customers share personal details, and addressing these comments shows attentiveness. Special cases, such as when a product is intended as a gift, require distinct responses. So, despite the fact that those “first contact” emails are 99% based on templates, assembling them properly was too intricate for a scripted solution at that time. Back then, an automated solution would have required heavily restructuring the contact form, which could have negatively impacted the already successful customer journey. My recommendation, hence, was to keep the task in human hands.
Fast forward to today: thanks to advancements in LLMs and generative AI, we can now automate personalized emails while maintaining the high-quality customer experience my client is known for. This article explains how to set up a system that processes incoming emails, assigns them to GPT-4 (or another LLM model), and generates fully customized replies.
My client has agreed to share this story as long as their identity remains confidential. Suffice it to say, they are a mid-sized company offering unique and highly customized craft products.
Preparation: Checklist for Your AI-Powered Email System
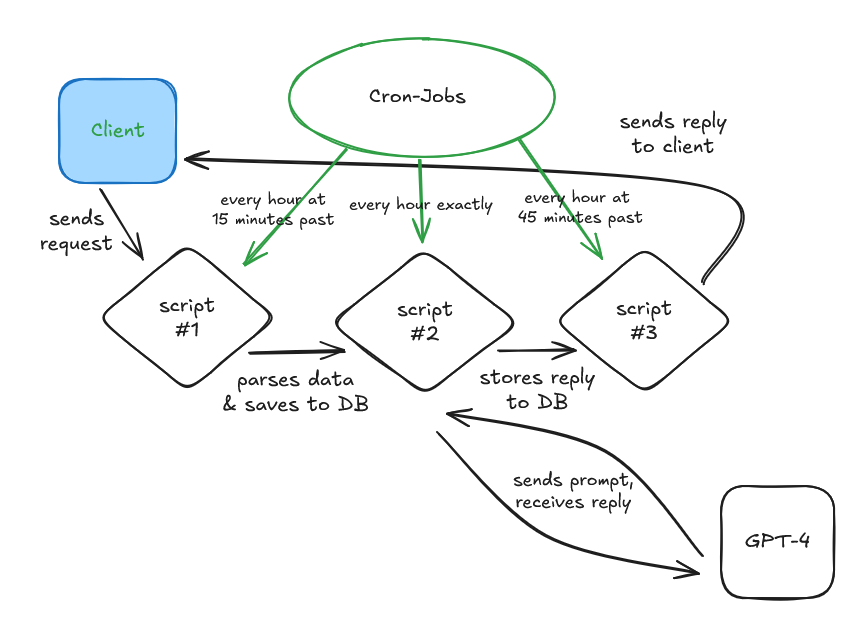
To set up our system, we developed three different Python scripts triggered by cron jobs. This ensures that client requests are not answered too quickly (minimum delay: 1 hour 30 minutes) and no emails are sent outside of office hours (8:30 PM to 7:30 AM).
Before we look into the scripts step-by-step, here’s what you need to prepare:
System Requirements / Checklist
- Linux-based hosting environment capable of running cron jobs (my client uses All-inkl.com)
- SSH access to the server (use Putty if you are on Windows)
- FTP access (e.g., FileZilla)
- IMAP and SMTP account & server credentials
- MySQL database and table with fields for each form input, plus id, status, parsed_timestamp, and sent_timestamp
- OpenAI API Key
- Python 3.12 or newer
- Required Python libraries: openai, pymysql, imaplib, email, beautifulsoup4, dotenv
Make sure you have access to all of these resources before you start setting up the automation scripts.
Script #1: The Email-Parser
The first step is to detect new client requests in the inbox and prepare them for further processing. This does not require AI — just a simple Python script, email_parser.py.
The script does the following:
- Connects to the email server via imaplib
- Checks for emails with a specific subject line
- Extracts form field data
- Stores data in MySQL with status “new”
- Records timestamp in parsed_timestamp
- Moves processed emails to a separate folder
- Implements basic error handling and logging
Example code snippet for data extraction:
def parse_email_content(raw_email):
    """Parses the content of the email and extracts required fields."""
    msg = email.message_from_bytes(raw_email)
    body = None

    if msg.is_multipart():
        for part in msg.walk():
            if part.get_content_type() == "text/html":
                html_content = part.get_payload(decode=True).decode()
                body = BeautifulSoup(html_content, "html.parser")
                break
    else:
        body = BeautifulSoup(msg.get_payload(decode=True).decode(), "html.parser")

    # Extract data
    parsed_data = {
        "Name": clean_text(body.find(["strong", "b"], string="Name")) or "Unknown",
        "Phone": clean_text(body.find(["strong", "b"], string="Phone")) or "Unknown",
        "Color": clean_text(body.find(["strong", "b"], string="Color")) or "Unknown",
        "Version": clean_text(body.find(["strong", "b"], string="I’m interested in version")) or "Unknown",
        "Comment": clean_text(body.find(["strong", "b"], string="Comment")) or "",
    }

    return parsed_data
Of course, you must adjust your script to the specific requirements of your use case. Later, we will set up cron jobs to run this script periodically. For testing purposes, you can execute it directly in the shell with this command:
python3 email_parser.pyOnce our first script is up and running, we can turn our attention to the second script, which checks the database for new entries and prompts an LLM agent to generate responses according to our instructions.
Script #2: The Response-Generator
The second script — response_generator.py — is the metaphorical heart of our system, as it manages the generation of the responses we later want to send. It is also the part that will likely require the most tinkering, as we want the responses to be of consistently high quality.
How the script works:
- It checks the database for “new” entries and extracts their data.
- The data is wrapped in a prompt containing specific rules, instructions, and templates.
- This prompt is sent to GPT-4 via the OpenAI API (excluding the email address, as the AI doesn’t need this information to generate a response).
- The response from the LLM is saved into our database.
- The database entry is updated to “pending.”
The prompt is the part that requires the most attention. In our use case, it was necessary to include templates and examples for various cases, along with a long list of rules to adhere to. Due to API fees, you should always try to keep your prompt as concise as possible while ensuring it is precise enough to generate the desired results.
GPT-4 can be prompted using the following function, which combines a static prompt with dynamic request data:
def generate_expanded_prompt(email_data):

    # Customer Request Data
    customer_request_data = f"""
    Customer Request Data:
    - Name: {email_data.get('name', 'Unknown')}
    - Product Preference: {email_data.get('option', 'Unspecified')}
    - Special Request: {email_data.get('comments', 'None')}
    """

    # Refinement Instructions
    refinement_instructions = """
    Here come your instructions. E.g:
    - Ensure a warm, friendly, and professional tone.
    - Include all provided customer details in a structured manner.
    - Adhere to approved templates and response styles.
    - Conclude with a polite closing and an invitation for further questions.
    """

    # Final Prompt
    prompt = f"""
    ROLE:
    You are an AI assistant responsible for drafting customer service emails.

    {customer_request_data}

    RESPONSE GUIDELINES:
    {refinement_instructions}

    TASK:
    Generate a well-structured email response based on the above details.
    """

    return prompt
This part sends the structured prompt to GPT-4, instructing it to generate a customer service email based on the provided details. It also sets parameters for response length (max_tokens) and creativity level (temperature) for optimal output:
            response = client.chat.completions.create(
                model="gpt-4",
                messages=[
                    {"role": "system", "content": "You are a professional customer service assistant."},
                    {"role": "user", "content": prompt}
                ],
                max_tokens=1000,
                temperature=0.7
            )
You should test the results thoroughly before moving on, as your prompt might require adjustments. Populate the database with sample requests covering all types of different requirements, including special cases, run the script and check the results. Keep refining your prompt and instructions until the results are 100% satisfactory.
Of course, the choice of model also impacts the results. For more information on available models and how to fine-tune your own, continue reading below.
Intermediate Step: Pick the Right Model or Fine-Tune Your Own
You don’t have to use GPT-4 for this system — you can use any available model that offers API connectivity. In this particular use case, it might have made sense to train our own model, given the availability of sufficient training data. However, at the time of writing, OpenAI only allows fine-tuning of GPT-3.5 turbo and below. Due to the complexity of our task and the requirement for linguistic eloquence, GPT-3.5 turbo wasn’t an option.
If you have sufficient training data and can compile it efficiently, fine-tuning can be done in a few simple steps:
- Prepare the training data in JSONL format and upload it to your server.
- Validate the data with this command: openai tools fine_tunes.prepare_data -f dataset.jsonl
- Upload the dataset to OpenAI: openai api files.create -f dataset.jsonl -p “fine-tune”
- Start fine-tuning: openai api fine_tuning.jobs.create -t “file-id” -m “model-name” (e.g., gpt-3.5-turbo)
- Check training status: openai api fine_tuning.jobs.list
You’ll receive a notification when training is complete (usually within a few hours) along with the ID of your fine-tuned model. To use it in our script, replace model=”gpt-4″ with your model’s ID.
A Note on API Fees
API fees vary significantly between models. For example:
- GPT-4o currently charges $2.50 per 1M input tokens and $10.00 per 1M output tokens.
- GPT-4o mini charges $0.15 per 1M input tokens and $0.60 per 1M output tokens.
Due to the extensive prompt of our use case, the API fees for GPT-4 translate to slightly less than $0.09 per request. With GPT-4o Mini, fees are less than 10% of that while still delivering excellent results. Since these emails serve as the first point of contact with clients, my client didn’t want to compromise on quality. Manually responding to inquiries took several hours of manpower each day, making even a few dollars in API fees a worthwhile investment, as long as the results are satisfactory.
Script #3: The Email-Sender
The response generator ensures that new database entries are checked, and responses are generated. The status is then updated to “pending.”
If human supervision is desired, a manual review step could be added here, where human agents review responses before marking them as ready for sending. In this case, we trust GPT-4 and opt for maximum automation.
To achieve this, we need a third script – email_sender.py.
This script does the following:
- Checks the database for “pending” responses.
- Formats the responses (color, font, and size).
- Adds signature data.
- Adds the subject line.
- Sends the email.
- Saves a copy to the “sent items” folder.
- Updates the database entry to “answered.”
This script is quite straightforward and didn’t take much time to write. The most crucial part is ensuring correct formatting and that nothing goes missing (including line breaks).
Bringing It All Together with Cron Jobs
Now that we have our three individual scripts doing what they are supposed to do, we can use cron jobs to automate the entire system in a way that fits our requirements.
We set it up so that:
- The response generator runs every hour on the hour.
- The email parser runs once an hour at 15 minutes past.
- The email sender runs once an hour at 45 minutes past.
This setup ensures that at least 90 minutes pass between parsing an email and sending out the reply, preventing replies that are sent too quickly. Additionally, the email sender only runs Monday to Saturday, from 7:30 AM to 8:30 PM, so clients don’t receive emails at odd hours.
Here’s the cron job configuration:
# Run email parser every hour at 15 minutes past
15 * * * * /path/to/email_parser.py

# Run response generator every hour at 00 minutes past
0 * * * * /path/to/response_generator.py

# Run email sender every hour at 45 minutes past
45 * * * * /path/to/email_sender.py

# Run email sender only Monday to Saturday from 07:30 to 20:30
30 7-20 * * 1-6 /path/to/email_sender.py
This setup ensures that our automated emails are not only well-crafted but also well-timed. However, the exact timing depends on your use case. In some scenarios, it might be better to introduce either shorter or longer delays between receiving a request and sending the response.
Important Notes on Security
First of all, LLMs can hallucinate, and no matter how much you test your system, unexpected responses are always possible.
Regarding cybersecurity, here are some essential precautions to improve the security of your project:
- Protect API keys & credentials: Store sensitive keys and passwords (OpenAI, email, database) in an .env file, never in the code.
- Set proper file permissions: Use chmod 600 .env to restrict access.
- Use least privilege for database users: Grant only necessary permissions.
- Sanitize database inputs: Always use parameterized queries to prevent SQL injection.
- Secure email handling: Strip HTML and scripts using BeautifulSoup to prevent XSS attacks.
- Limit IMAP requests: Prevent email server overload by rate-limiting requests.
- Restrict SSH access: Use key-based authentication and disable root login.
- Enable a firewall: Use ufw or iptables to restrict access to necessary ports.
- Keep software updated: Regularly run apt update && apt upgrade.
- Log errors carefully: Avoid logging credentials or sensitive data.
- Implement API rate limits: Prevent excessive or abusive requests.
- Restrict OpenAI API usage: Allow only necessary models and endpoints.
These are just recommendations, and I take no responsibility for whatever may or may not happen if you attempt to replicate the software architecture outlined in this post. 😉
Results & Summary
In this post, we explored how to automate complex email responses using AI, by building a system that:
- Processes customer inquiries
- Generates personalized responses
- Sends emails without human intervention
We also covered prompt engineering, model selection, API cost considerations, and cybersecurity best practices to ensure a reliable and secure AI-powered email response system.
The use case has been live for several weeks, and my client is very satisfied. The response rate (i.e., clients replying to the first email we send them) has even increased slightly, likely due to the well-timed responses — something that was difficult to manage manually. Moreover, the time savings are significant, as my client typically answers 20-25 requests per day, and it would take 5-10 minutes per request to do this manually. Automating this process has freed up several hours daily, allowing their team to focus on higher-value tasks rather than repetitive email responses.
The next step? Automating even more email-related tasks, like follow-up emails. This, along with many other features, could be built on top of the system architecture outlined above. I’m excited to see how much more repetitive work we can offload to an LLM. If possible, I’ll share more insights here in the future. So, stay tuned or check back soon!
Are you interested in implementing AI email automation for your business? Contact me for a consultation.
